Live mixing
Pop-up Channels supports mixing live and VOD content in scheduled channels.
Live mixing is in beta. Please speak to your JWX representative if you would like to try the live mixing feature.
Please note, the live mixing feature comes at an additional cost. Please speak to your JWX representative for details.
Requirements
- Your JWX account must have the Broadcast Live SaaS entitlement
- Your Pop-up Channels account must have the live mixing entitlement
- Pop-up Channel must be a scheduled channel
- The live mixing option must be enabled on the Pop-up Channel
- Live sources must:
- Use JWX Broadcast Live SaaS
- Use the "Pop-up Channels" stream config.
- Stream configs are created by a JWX representative and appear as a dropdown option when creating a live stream in the dashboard. They can also be listed via the Management API. If you do not see this option, reach out to your JWX representative.
- Have a DVR window set (not "no DVR")
- Be at least 10 minutes long
- Your Broadcast Live stream must be live (i.e., your encoder is sending and the HLS output is available—this can be during the
stream_warmup) before its scheduled start time on the Pop-up Channel. If the stream is not available at the scheduled time, it will not play in the Pop-up Channel and your filler slate will play instead. - Your Pop-up Channel must be started before the scheduled start time of any live content.
- VOD content used in a live mixing channel should match the frame rate, resolution and aspect ratio of your live content to ensure smooth playback across devices
Limitations
- Live mixing is not supported for looping playlist channels
- Live mixing is not supported for DRM channels
Usage
Creating a Broadcast Live Stream
- In the JWX Dashboard, navigate to the Broadcast Live page.
- Click Create live stream. The Create a live stream panel appears.
- Under Stream config, select "Pop-up Channels" (if you do not see this option, please reach out to your JWX representative to have it added to your property).
- Under Advanced settings > DVR window, select a DVR window length (not "No DVR").
- Set the remaining options to your needs as described in the Broadcast Live documentation.
Creating a channel with live mixing
-
In your Pop-up Channels dashboard click the Create channel button, the Create channel panel appears.
-
Under the Channel type, select "Scheduled".
-
Switch the Live mixing toggle to "On."
warningLive mixing can only be enabled when creating a new channel and cannot be changed after channel creation.
-
Complete the remaining channel fields and click Create.
-
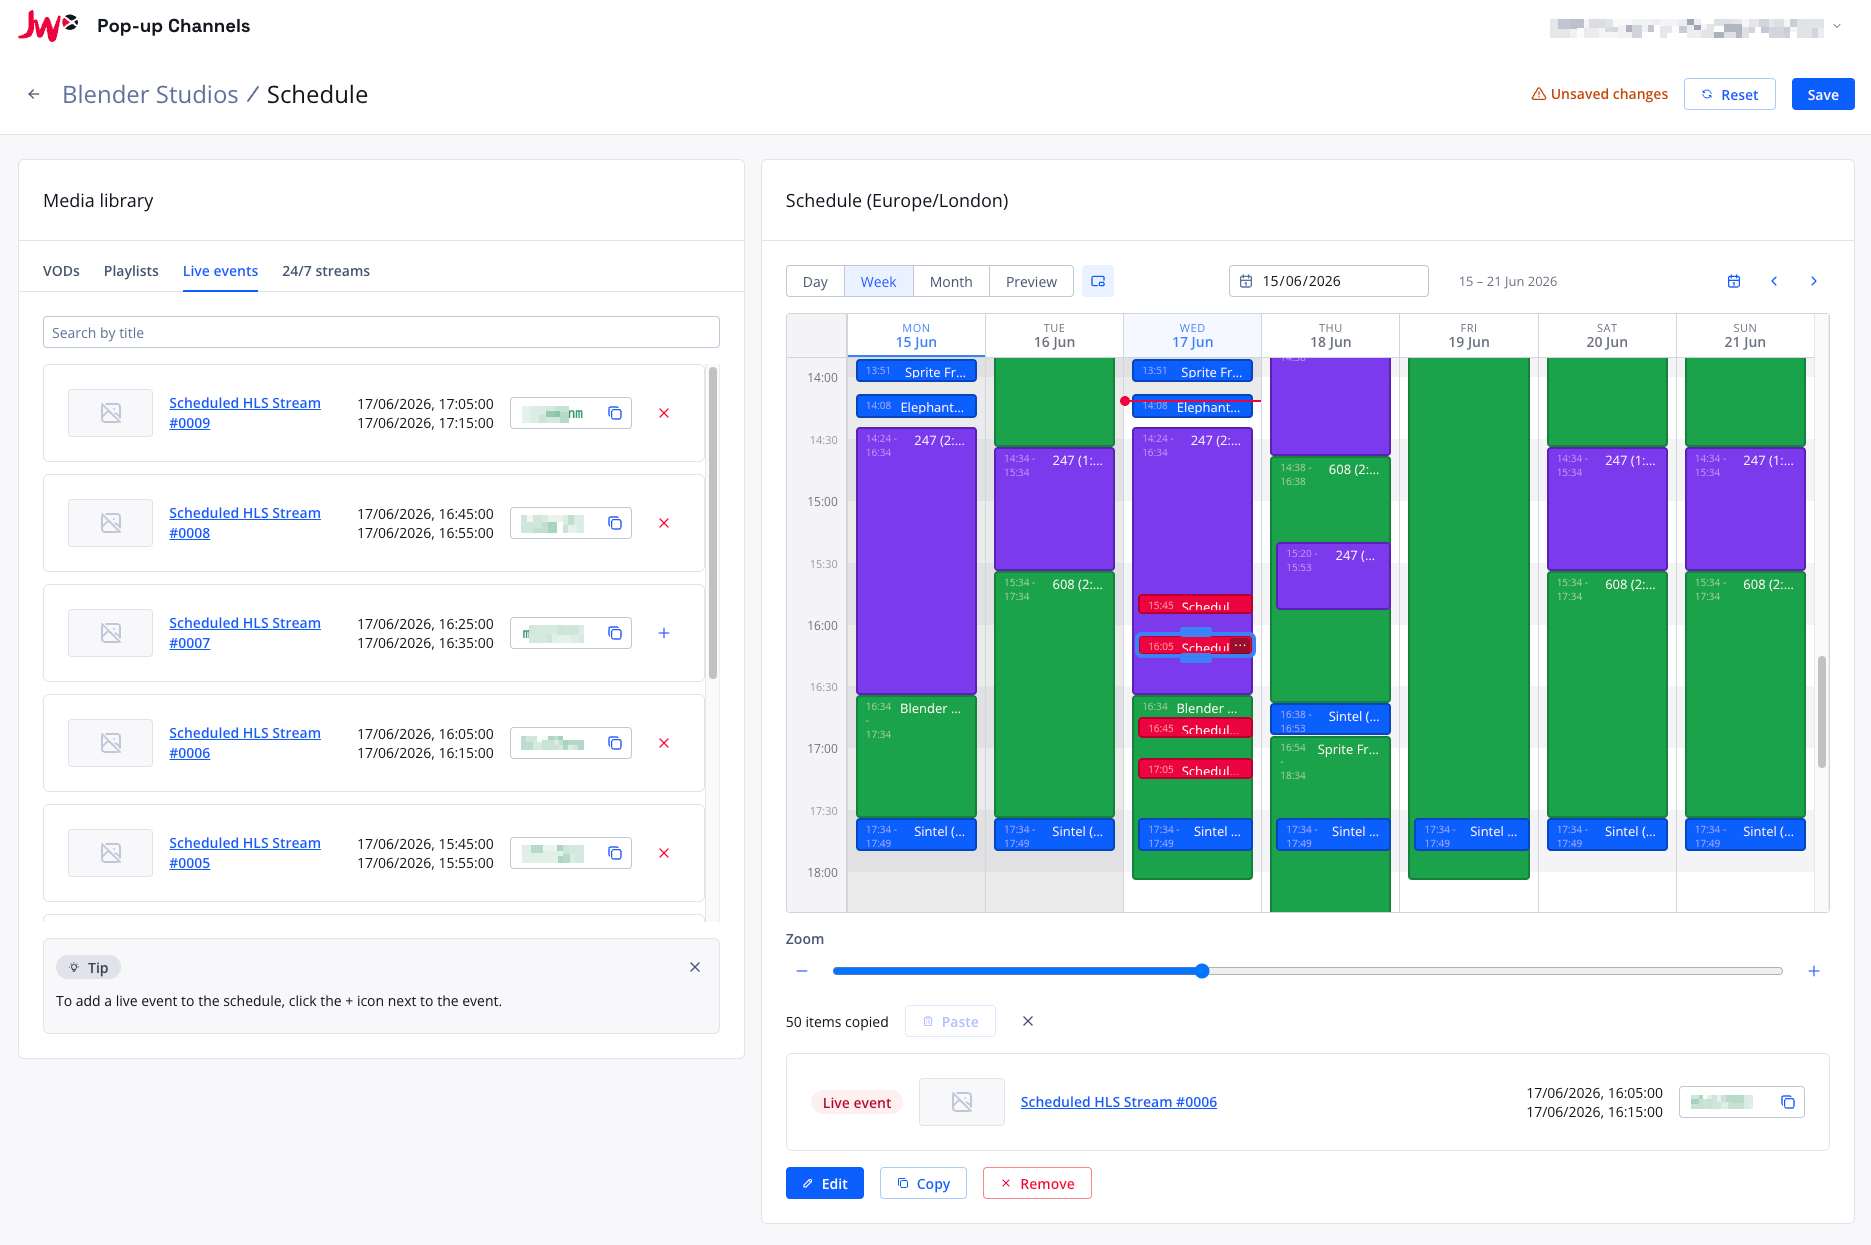
In your new Pop-up Channel with live mixing enabled, navigate to the Schedule section and click the Edit Schedule button. You will now see "Live events" and "24/7 streams" tabs in the scheduling view.
Scheduling a live event on a channel
- Click on the Live events tab, you will see a list of scheduled live events in your property.
- Click the + button next to the live event that you would like to add to your Pop-up Channel schedule. The event will now show in the schedule at the start time of the live event.
- To adjust the start and end offset, click the event in the schedule view and click "Edit". You can then modify the start and end offsets in seconds.
- In the same panel, you can set a time shift to delay the stream itself by up to 6 hours (21600 seconds). Leave it empty for no delay.
Scheduling a 24/7 stream on a channel
- Click on the 24/7 streams tab, you will see a list of 24/7 live streams in your property.
- Drag the desired 24/7 live stream from the list over to the schedule view.
- Set the start and end times of when the live stream should play in the Pop-up Channel by using the handles that appear in the live stream block, or select the live stream block, then click "Edit" to key in precise start and end times.
- In the same panel, you can set a time shift to delay the stream by up to 6 hours (21600 seconds). Leave it empty for no delay.
The scheduled live stream block must be at least 10 minutes long.
For further details on using the scheduler, please see updating the schedule.
Live ad blanking
If your live sources contain their own commercials during ad breaks, you can have Pop-up Channels replace them with your channel's SSAI ad slate.
Live ad blanking requires the live ad blanking entitlement. Please speak to your JWX representative if you would like to use it.
Requirements
- Live mixing must be enabled on the channel
- SSAI must be enabled on the channel, with an ad slate selected
- The ad slate must have MP4 renditions
- Ad breaks must be signalled in your live stream
Enabling live ad blanking
- On the channel's page, expand the SSAI section.
- Switch the Live ad blanking toggle to "On".
- Click Save.
Live ad blanking can be switched on or off at any time. The change applies to live programs that have not started yet; a live program that is already playing keeps its current setting until it ends.
During each ad break in a live source, the ad slate plays in place of the source's commercials. The ad breaks are kept in the channel's stream, so they can still be used for ad insertion with JWX SSAI.